Cheapest Ways to Cover Popcorn Ceiling [Without Removing It]
Popcorn ceilings are a common problem for most modern homeowners due to their out-of-vogue look. The popcorn texture also makes it easier for spiders to form cobwebs on the ceilings. Most people get rid of textured ceilings by scraping it off, but this is a messy, time-consuming solution. So, what are the most cost-effective ways of covering up a popcorn ceiling without removing it?
The cheapest ways to cover up a popcorn ceiling without removing it is by installing readily prepared ceiling planks right over it. You can also use ceiling-grade drywall panels or large pieces of fabric to conceal the texture. Panting the ceiling with eccentric shades is also a great option.
Textured ceilings present some health risks due to the presence of asbestos in old popcorn ceilings. Hiding the popcorn ceiling without removing it is usually a better alternative. You’ll learn how to cheaply cover textured ceilings in this article, plus the costs involved.
Can you hide textured ceiling with anything?
Popcorn/stucco ceiling texturing was popular in the 60’s and 70’s. However, in today’s world, it’s considered old-fashioned and has little aesthetic and functional appeal. Fortunately, there’s a wide range of options you can opt for when looking to cover up your popcorn ceiling. Some of the cheapest options include covering it up with tongue-and-groove wood panels, drywall panels, prepared fiberboard ceiling planks/tiles, fabric, and paint patterns.
Cheapest Ways to Cover Popcorn Ceiling
While there are many ways to conceal a dated popcorn ceiling, not all of them are cost-effective. This section of the article focuses on ways to cover your stucco ceiling without breaking the bank.
Here are cheap covers for popcorn ceilings:
1. Hiding popcorn ceiling with wood planks
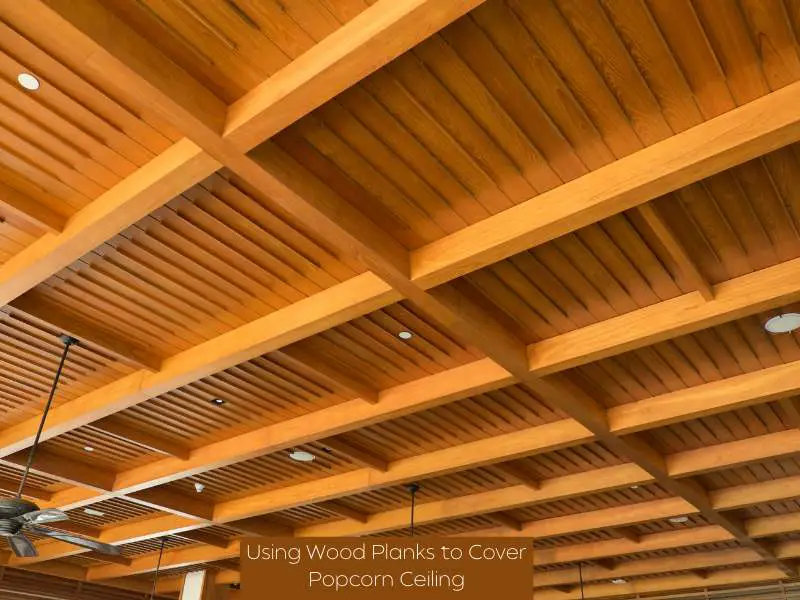
Covering a textured ceiling with wood planks is a relatively cheap option. You can easily buy wood planks starting from one-dollar per square foot. What’s more, wooden planks that feature tongue-and-groove paneling are quite easy to install.
The most significant benefit to covering your popcorn ceiling with wood, though, has to be the beautiful, natural aesthetic that it adds to the room. You can also paint over the planks to your desired taste. To effectively hide your textured ceiling with wood planks, follow the procedure detailed below:
- Locate the rafters– using a stud finder, situate the ceiling joists and mark them out using tape or a marker pen. Then, cut down the wood planks to size, ensuring to leave a 0.25-inch expansion gap on either side. After cutting the planks, secure them to the joists by nailing them down. There should be a gap of at least 0.5-inches between the planks and the wall.
- Cut out light fixture holes– using a jigsaw, create holes for the lighting fixtures and vents on the wood planks.
- Install the wood planks- install the wood planks by nailing them down to the popcorn ceiling. Meanwhile, if you have tongue-and groove wood panels, simply lock them against each other to secure them in place.
- Sand, prime, and finish the wood ceiling– before lightly sanding the newly-installed wood plank ceiling, fill in any nail holes with wood filler. Then, sand the ceiling and apply a single primer coating. Finally, paint or finish the ceiling. For faster painting and a smooth finish, use a paint sprayer. We also recommend going for a semi-gloss finish that will reflect light and brighten up your room.
- Install the ceiling trim– the final step is to nail down 0.5-inch thick strips of plywood around the edges of the wood ceiling- for the trim. After securing the strips to the edges, sand them down, apply caulking, and finish off using primer and paint.
2. Cover the popcorn ceiling with drywall panels
Drywall boards are also great for covering up popcorn ceilings. Not only do they provide a smooth, level surface that can be sanded and painted, but are also relatively cheap.
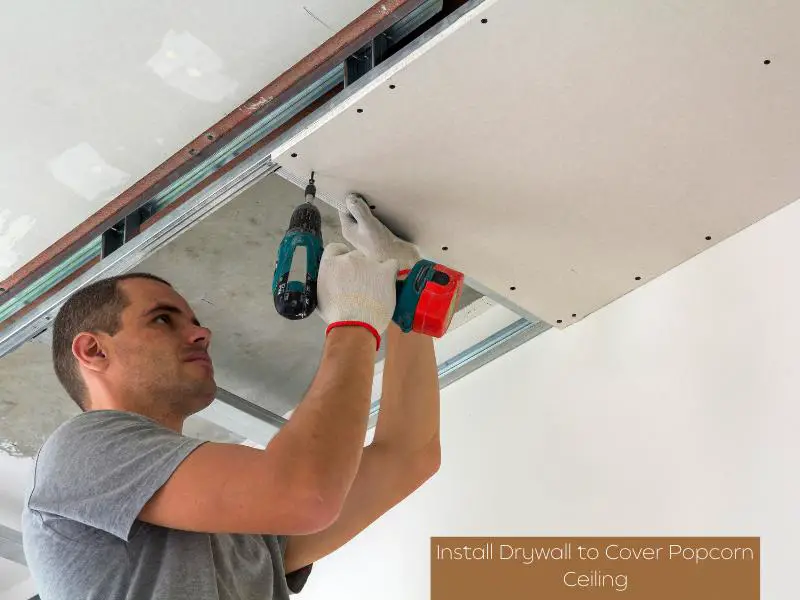
The only downside, though, is that hanging and finishing drywall ceilings can be a difficult task that may require expertise. That being said, to effectively hang drywall over your drab-looking stucco ceiling, follow the steps detailed below:
1. Install shims on exposed joists
Measure the thickness of the frame of an exposed joist and cut out spacers/shims to that dimension. Then, secure a measured-out shim to the joist using screws and a screwdriver. This creates a level surface for the gypsum board panels to attach to.
2. Locate and mark out the ceiling joists
Using a good stud finder, situate the center of the ceiling joists and mark them out using tape or a chalk line. Alternatively, you can probe for trusses by simply nailing through the drywall. Standard American ceiling joists are usually spaced either 16-inches or 24-inches apart.
3. Extend junction boxes
To create a flush surface for the new drywall, extend any electrical boxes on the ceiling using mud rings. Simply secure a 0.5-inch mud ring to each junction box using screws and a screwdriver.
4. Cut out your drywall sheets to size
Measure out the distance from the wall to the chalk line that you’d earlier used to mark out the center of the joists. You’ll want to minus 0.25-inches from this measurement, in consideration of the expansion gap.
Then, cut the drywall sheets in accordance with your final measurement. Also, remember to cut off the tapered edges off the drywall sheets. This allows for easier installation of the tear-away bead along the expansion gap later on.
Pro tip: Remember, it is recommended to use 1/2-Inch-thick drywall for ceilings to avoid extra weight that can cause cracking noises in your ceiling.
5. Hang your drywall
With the drywall panels already measured out and cut to length, it’s now time to hang them to the ceiling and secure them to the ceiling joists. Raise and position the sheets on your popcorn ceiling, ensuring they’re aligned with the chalk lines. A drywall lift makes this task faster and less labor-intensive. Also, for the edge sheets, ensure to leave a ¼-inch expansion gap at the edges.
Remember, too, that it’s not always advisable to stick to the norm and install sheetrock perpendicular to the ceiling joists. Sometimes, the opposite approach may be more practicable, depending on the size of your room vis-à-vis the size of the drywall panels. Running the panels parallel to the joists is usually done to avoid ‘butt joints’ which create a finishing problem.
You’ll be working on one drywall panel at a time. Therefore, once a panel has been properly positioned, secure it in place by screwing it down along the edges and close to the center. Then, move on to the next panel and repeat the process.
6. Install the tear-away bead
The traditional method for finishing the expansion gap at the point where the wall meets the ceiling is to use drywall mud. However, it’s not easy to correctly apply coats of joint compound and have them dry fast, especially for newbie DIYers. An easier and faster alternative is to install tear-away beading.
Cut the tear-away bead to length using metal shears. Then, staple it to the edge of the drywall, at eight-inch intervals. To avoid any unsightly gaps, make sure the beading is snugly positioned against the wall before stapling it down. Once fastened, skim-coat the tear-away bead with joint compound.
Finally, sand and paint the beading and let the paint cure before tearing off the flange for a nice, smooth finish on your wall-to-ceiling joint.
3. Hiding Popcorn Ceiling with Prepared Ceiling Planks

Prepared fiberboard ceiling planks are also quite cheap and will effectively conceal your bland popcorn ceiling. To install prepared planks over your existing ceiling, screw down metal channels to the ceiling joists. Then, secure the planks to the metal channels.
Prepared ceiling planks offer several advantages. These include superior design aesthetics, as they feature factory-embossed designs. This also eliminates the need to paint or finish them, as is the case with drywall ceilings. Also, you can easily level the channels during installation, thus eliminating the issue of dips in the old popcorn ceiling.
On the downside, though, prepared ceiling planks are more costly compared to both natural wood planks and drywall panels. Also, despite the patterned designs, fiberboard ceilings don’t look as great as natural wood ceilings.
4. Hiding Popcorn Ceiling with Fabric or Paint
Finally, you can also cheaply hide your unsightly stucco ceiling texturing using fabric. Note, though, that it takes some level of skill to sew fabric panels together and install them on the ceiling.
Another alternative is to paint the ceiling with eccentric shades. This won’t actually conceal the popcorn texture, but will divert visual attention from it to the beautiful paint patterns.
Cost of Covering Popcorn Ceiling
The cost of covering a textured ceiling depends on various factors, including the size of the room, the type of ceiling cover you’re going for, and whether it’s a DIY project or you’re hiring a pro. Drywall is cheaper than wood, with prepared fiberboard being the most expensive.
That being said, your total costs for such a project could range between $900- $2840.
MORE ABOUT CEILINGS
- What is The Thickness of Ceiling Drywall?
- Why Popcorn Ceilings Crack (With Fixes)
- Can You Put Shiplap Over Popcorn Ceilings?
- Asbestos in Popcorn Ceilings
- Signs of Water Damage on Popcorn Ceilings
- Great Alternatives to Popcorn Ceilings
- How to Remove Popcorn Ceilings Without Scraping